Experts Need expert help? Don’t hesitate to talk.
If your eCommerce store is built on Magento and you are thinking to start another one, then you don’t have to build it on another platform. Because Magento 2 offers a feature to set up multiple websites from a single dashboard.
Magento 2 comes with the out-of-the-box multi-store feature. This feature comes handy when you have to expand your business in other sectors or internationally as well. You can manage all the stores and inventory from just one administration of Magento 2.
Other benefits of managing multi stores from single administrations are as below,
- You can use similar payment and other third-party extensions for all your stores.
- Unified support for all the integrations and extensions you use on all your Magento 2 store.
- You can use the same content for pages like privacy policies, terms, and conditions, disclaimers, etc.
- You can retain all the customer databases to use in all the Magento 2 stores.
A store is a frontend of any website, which means you can set up different layout, templates, themes, designs, and languages for different stores. You need three different components…
1) website, 2) stores, 3) store view … to set up multiple Magento 2 stores.
Let’s see what you can do with each component of the multistore,
- Websites:
You can maintain a separate database for different websites, or share the same database across all the websites. You may define a different base currency and price for different websites or use the same price across the globe. It allows maintaining a different order base for all the websites. Also, the use of different or the same website URL is permitted.
- Stores:
Share customer accounts across all the stores for a specific website. It allows you to set the same or different base currency and prices for products across all the stores. You can assign products specific to one store and set different root categories for different stores.
- Store View:
You can distinguish between store views by setting them up for different languages. It allows you to display different prices. You may be able to configure the different categories for different store views. Store views can share the same root categories.
Now, let’s get to know how you can setup multi-stores on Magento 2. But first, let’s look at some important notes.
- Before importing catalog and products, it is necessary that you set up multi-stores first. Because you may need to edit products from that catalog to show on all the websites. It will be a real pain in the back if you have a high number of products.
- The inventories across all the websites and stores are set globally. That means the product is either in stock or out of stock for all stores. You have to use a third-party tool that allows you to have different inventories if you need it.
- Before adding any items in your stores, it is strongly recommended to plan out the website structure. This ensures that your system is built on logical parameters that scale up as you grow.
How to Setup Multi Stores in Magento 2?
Below we have illustrated step by step procedure in detail for setting up a multistore in Magento 2. So, let’s get started then.
Step-1: The first step is to create a new website.
The first thing of the first step you should do is to log in to your Magento 2 backend dashboard. Next, navigate to the All stores from the Store menu in the left side panel of the dashboard. Find the option that says create a website on the store page. Now, you will have to fill the following details.
- Name: Enter the website name here as you wish.
- Code: Here, enter a unique code for the website you want to create.
- Sort Code: This is optional to fill and the value is set at 0 by default.
Click on the Save Web Site to save all the information.
Step-2: The next step is to Create a New Store.
The second step is to create a new store from the All store sections by following the same instructions given above. As you go into All stores, you will have an option to create a New Store. Click on that option and fill the necessary details.
- Website: From the dropdown, choose the website you want to set for this store.
- Name: Name your store here.
- Code: Add the code here.
- Root Category: Choose the root category from the dropdown menu. You can also add a new root category by going into Product>Categories.
Click on Save Store after filling the necessary details.
Step-3: The third step is to create a new store view for the store.
Go into the same All store section from the left side panel. You will find an option to create a new store view. Click on that option and fill the necessary details as listed.
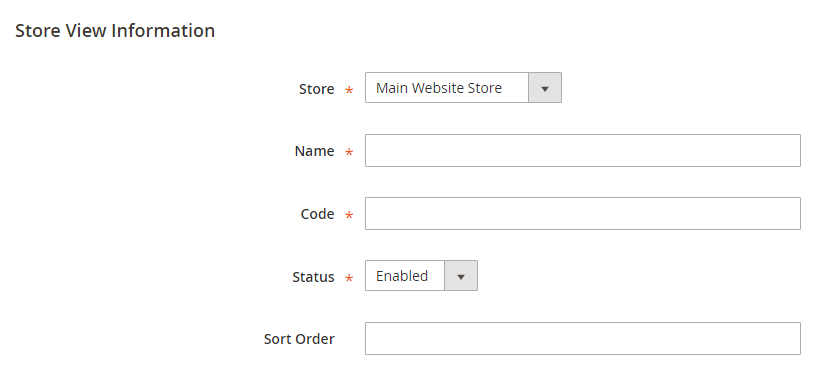
- Store: Select the store of your choice.
- Name: Name the store view of your choice.
- Code: Enter the code for the store view.
- Status: Enable or disable the store view status from here.
- Sort Code: This is an optional field and the value of it is set to 0 by default.
Click the Save Store View once you have filled the necessary details.
Step-4: Set up the URL of the store
Before we get into step 4 you want to change the current application model from default to the developer and also give permission to the following directories.
chmod -R a+wX var
chmod -R a+wX app/etc
chmod -R a+wX pub
Now let’s get into the step-4.
Navigate to the Stores>Settings>Configuration>General from the dashboard of Magento 2, then select the web from the side panel.
Select the new store view you have added from the top of the page.
Select and expand the Base URLs option. To make any changes, first, you have to uncheck the Use Default option. Now, you will have to fill the following necessary details.

- Base URL: Here, you have to enter the base URL.
- Base Link URL: Here, you have to enter the base link URL.
- Base URL for Static View Files: Here, you have to enter the URL for static view files.
- Base URL for User Media Files: Here, you have to enter the URL media files.
The procedure should be the same under Base URL Secure if you need HTTPS access.
Once everything is complete, click on Save Config. Navigate to the Cache Management system and flush the cache. By specifying the URLs, you will be able to see different stores and store views in your browser.
Wrapping Up
Once successfully configured, your new domain, store, and store view will start to work with your existing Magento 2 installation. Now you may start to develop and design your store and store view from scratch. If you face any problem while setting multi-store in your Magento 2, then you can hire a Magento developer who will resolve all the issues and will set up the multi-store for you.